Our project to build a Dual PIII-S 1.4Ghz system on the Asus P2B-DS
mainboard ran into a serious problem when it was found the Upgradeware
Slot-T adapters we were planning to use did not work in CPU slot 2 on
our mainboard - the system ran perfectly with a single PIII-S and Slot-T
in CPU slot 1, but would not POST when the CPU and adapter were moved
to slot 2. Upgradeware technical support were unable to resolve the
issue, so we resorted to modifying Asus S370-DL Rev 1.02 adapters to
achieve our goal. The first step was to remove the Socket 370 cover by
gently prying at the two locations shown below with a small screwdriver.

There are a number of web pages detailing the modifications required
to run Tualatin processors on Slot 1 adapters designed for Coppermine
processors. The modifications involve removing or insulating the two
pins Intel used to prevent Tualatin processors running on unsupported
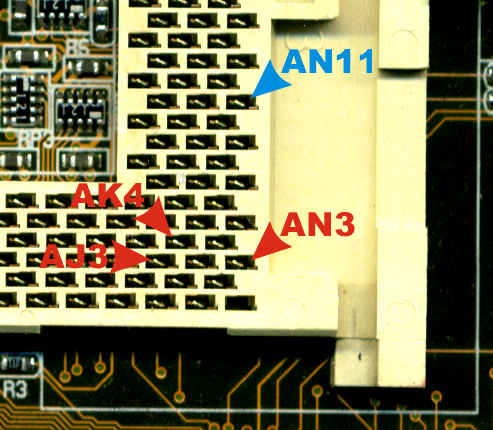
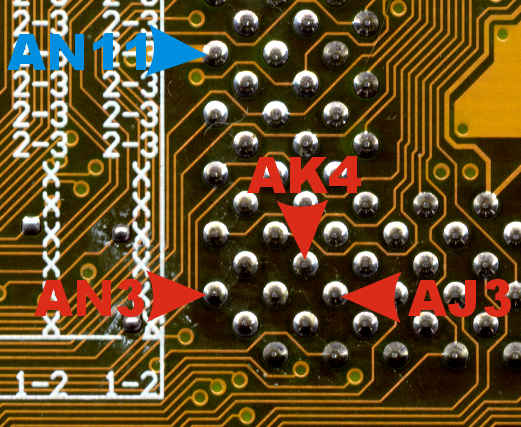
platforms, and changing the (previously unused) VttPWRGD signal on pin
AK4 from a logic '0' to a logic '1'.
The pages we reviewed suggested changes to both the CPUs and Slot 1
adapters, but our goal was to avoid any changes to the CPUs themselves
as we preferred to make all modifications on the much cheaper Slot 1
adapters.
 Front |
 Back |
 |
The pins which must be removed
are connected to ground. The ground plane sinks much of the heat from
the soldering iron, so we used a heavy chisel tip and a 45w iron to
push the pins from the back until they were flush with the circuit
board. |
 |
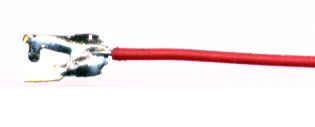
We then used the pointed tip
shown at left in a Weller WES50 soldering station to push the pins
through the circuit board from the back. Again, heatsinking was a
problem, and we found it neccessary to use the maximum temperature
available (850F) on the soldering station. |
 |
The pins now protruded slightly above the 370 pin socket on the front of the circuit board, so it was possible to grasp them with a surgical clamp and pull them out while heating from the back with the pointed tip. |
  |
Back of the circuit board after pin removal, and one of the pins. |
There appear to be two schools of thought as to the correct source
of logic '1' to the VttPWRGD pin AK4. Some advocate connecting it
to PWRGD (AK26), either directly or via a 1K ohm resistor, while others
connect it to one of the numerous Vtt pins. Using PWRGD has the
advantage that it is an indication to the processor that all clocks and
power supplies are stable and within their specifications, however it
is a 1.8v signal. The Intel PIII-S Datasheet states that "VttPWRGD is not 1.8v tolerant and must be
connected to Vtt (1.25v)". We therefore opted to use Vtt as the source
for VttPWRGD, and selected pin AN11 - labelled in blue above - for the purpose..
 |
One of the removed pins was trimmed to remove the section that had been soldered to the board, and then soldered to a short length of 30 AWG wire-wrapping wire. |
 |
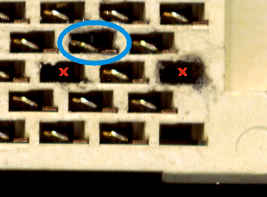
The modified pin was then returned to it's original position, AK4, in the S370 socket, leaving the 30 AWG wire protruding from the back of the circuit board. The permanently removed pins, AJ3 and AN3, are labelled x on the image. |
 |
The 30 AWG wire from AK4 was then connected to Vtt at pin AN11 on the back of the board, the S370 socket cover snapped back into place, and the modification is complete. |
Our system booted and detected both processors using a Slot-T adapter in CPU slot 1 and an Asus S370-DL adapter modified as described above in CPU slot 2, however it was not completely stable. Stability issues were resolved when the Slot-T adapter was replaced with a second modified S370-DL. Several motherboard modifications were also made to achieve Dual 1575Mhz on the P2B-DS, these are described here, here, and here.
Last updated May 10th, 2003 by p2b@sympatico.ca